Author Topic: Mickes Dengfu M06 build  (Read 15638 times)

MickeF

Mickes Dengfu M06 build
« on: March 11, 2017, 04:14:45 PM »
Hi,
I've just completed the build of my first full suspension bike: The Dengfu M06. And this is my first build thread!
(This is actually my second build: A few years ago I built myself a really great HT 29:er, the "Xmiplay IP-106", a great bike (and frame).)

Anyway, let's get to it!

Some numbers and parts:

Frame size: 17.5
Color: Pantone 431c, painted by Dengfu.
Fork: Fox Float 32 w. remote
Shock: Manitou McLeod
Gears: 11 sp Shimano XT, w. XTR shifter
Crank: XT single, 170mm, XTR Bottom Bracket
Chainring: AB Oval 34T 32T
Dropper: Brand-X ascend
Wheelset: (Used) Mavic CrossMax SLR. Stiff, light.
Tyres: (Used) RR on the back, NN in front.
Handlebar: Dengfu flat bar, with Dengfu 80mm stem

I ordered the frame February 18, and it shipped (after painting) Mars 2.
The frame arrived (I live in Sweden) just a few days later (!), mars 7. Quick!


Also, the next days the rest of the parts needed for the build showed up! (I took some parts from the old bike, and the fork I bought six months ago!)


Time for some assembling...


« Last Edit: September 08, 2017, 01:55:54 AM by MickeF »


MickeF

Re: Mickes Dengfu M06 build
« Reply #1 on: March 11, 2017, 04:30:07 PM »
The frame looks fantastic! (If you ask me!) The color is just right. Great finish, I could never have done something similar with "rattle cans garage job".


Bottom bracket:
I decided to put some "carbon assembly paste" on the BB but - despite this picture - later put it in the frame instead, so it wouldn't come off during install.
For installation, I used a tool I bought on Ebay, but it's not that difficult do use a DIY tool (a couple of big washers and a long bolt and nut).

Video of me preparing it with paste, and using the tool to mount the right side bearing cup. Creeeeeeking noise!  :o
(Klick image:)


Crank:
Not to difficult: Just push it in, tighten "just enough" to preload the bearings. And use a good torque wrench to tighten the left crank to the axel.

Chainring:
I mounted the AbsoluteBlack Oval 34T, and it JUST cleared the chain stay! (Ca 5-6 mm). Great!


Great. Let's move on to the rear wheel, cassette and shock...
« Last Edit: September 08, 2017, 01:58:13 AM by MickeF »

MickeF

Re: Mickes Dengfu M06 build
« Reply #2 on: March 11, 2017, 04:49:37 PM »
Cassette and Shock:
Nothing to complicated about installing the cassette, but I took the opportunity to change the bearings in my freehub (Mavic), but that's another story!

Oh, and I also installed the derailleur. No problem, just tighten with allen key.  (I ordered an extra hanger from Dengfu, just in case...)


Now on to the shock:
I ordered a pair of "Standard Bushings" from http://offsetbushings.com. Great service and communication! And the bushings look super nice. Very smooth!
Unfortunately I ordered a tad to short (22.0). Maybe 22.1 - 22.2 might have been better, but it's not a biggie. It's possible to tighten down that play. (I ordered the bushings before I got the frame, so I could start building straight away :) )

They (the guys at Offsetbushings) recommend replacing the DU bushing with their own in nylon, so I put together an really simple tool: Some washers, a IKEA screw with 15mm head (fits perfect to remove the bushing!) and one socket to act as distance.


And then I mounted the shock:


I had to tighten the shock bolts quite hard, and also shortened the rear one approximately 1 mm, since it was to long to give a "snug fit".

Next step: Fork.
« Last Edit: March 13, 2017, 02:28:47 AM by MickeF »

MickeF

Re: Mickes Dengfu M06 build
« Reply #3 on: March 11, 2017, 05:15:23 PM »
Fork and brakes:

The sun showed up, so why not move this project outside!

I shortened the fork steerer, but I kept it quite long, in case I need to adjust bar height later on. Better to cut it once again if needed.

Before I mounted the fork, I routed the gear wire and rear brake hose through the frame. Not that difficult, but it was easier with the fork not there, so I could guide it right with my fingers.

I also decided to put "Moto-style" brake setup: Front on right, rear on left (as they do it in England), since that's the best setup for the routing of cables in the frame. I guess it will take some time to get used to, but I also have a motorcycle, and it - of course - have front brake on right hand, so why not on my MTB?

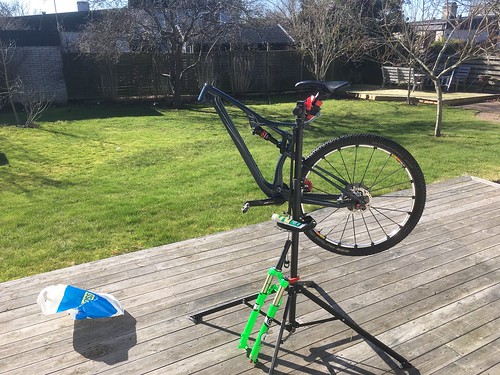
Now it starts to look like a bike! Fork shortened, cables routed and rear brake mounted:

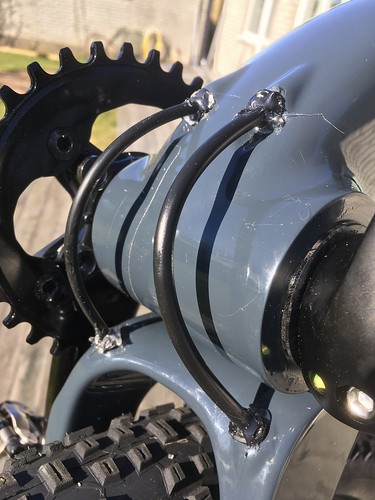
Ok. The brake hose and gear cable housing was laying tight against the frame under the bottom bracket. But when the suspension moved, the cables were scraping against the frame. Not good.
So I put some hot glue (!) in the openings to give the cables/suspension room to move freely.

Looks great, doesn't it?
Maybe not...
But it's alright. Almost no one will look under my bike!  ;D


Time to cut the brake hoses and route them to the right handles. There's a really great video over at GMBN of how to do that!

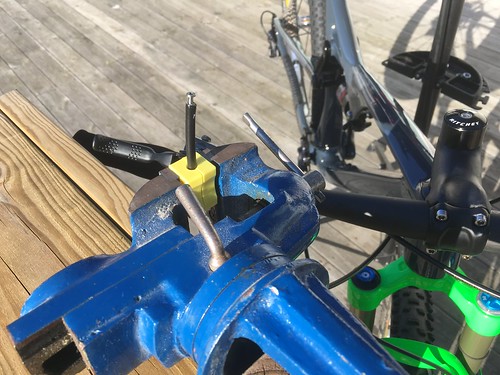
I used a small vise to hold the hose when mounting the barb and olive. Not that messy, but keep some paper or a rag nearby. It's not a great thing to get oil on your brakes...


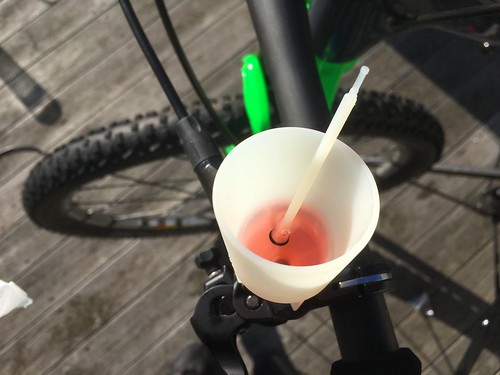
Then I bled the brakes. Shimanos "funnel" makes it really easy. Just screw it on, put some oil in there and watch the bubbles come out as the oil replaces them. Neat.


Ok. Brakes mounted.
Now it's time for gears!
« Last Edit: March 12, 2017, 03:36:13 AM by MickeF »

MickeF

Re: Mickes Dengfu M06 build
« Reply #4 on: March 11, 2017, 05:32:14 PM »
Gears, dropperpost:

I decided to go 1 x 11, since I like that on my HT. (Besides: It's not possible to put a front derailleur on the frame!)

11-42 combined with 34T (oval, that is), will be great!. Updated: 32 was better, still oval!
I also opted for a more advanced shifter: The XTR, since it's not that expensive upgrade, but of what I've red on the interwebz, it is quite a difference compared to XT. Time will tell!

Chain mounted as well.  Shimano chain.


I also mounted the remote for the fork, a Fox CTD.


Dropper:

During this part I pretty much saw the finish line and was to excited to take any pictures!  ::)

Routing the wire for the dropper post remote through the frame was a no-brainer. There's ready made route for droppers in the frame, and since I moved the dropper from my other bike it was a really quick job. The wire was already of correct length.

Also: I mounted a new saddle, the same model as I had on the old bike: A really affordable, comfortable and light Selle Italia Q-BIK Flow L2. Recommended! (270 gr)

The cockpit is now officially ready:


As you can see, there's quite a lot of controls on the left. I will try this for a while, and maybe move the dropper to the right if it's to hard to reach the control.

But: Now there's nothing more to mount on the bike, so...
Time to have a look. And a first run!  8)
« Last Edit: October 16, 2017, 06:21:52 AM by MickeF »

MickeF

Re: Mickes Dengfu M06 build
« Reply #5 on: March 11, 2017, 05:41:06 PM »
Done!

Here it is, ready as it has never been before:


And from an angle, looks a bit cooler if you ask me ;)


It is a really nice feeling to get on the bike and go for the first ride!
It feels GREAT!

Weight: Just over 11 kg (11.260)
The locking of the shock and fork makes it feel almost like a HT. (The McLeod has 4 steps of locking, the Fox Float has 3.)

I have only tried it around the block and on may lawn... Tomorrow I will take it for a real test ride.
Exciting times ahead!

The pictures can be seen in an album here: https://flic.kr/s/aHskQzyWJk
« Last Edit: March 11, 2017, 06:29:29 PM by MickeF »

maui400

Re: Mickes Dengfu M06 build
« Reply #6 on: March 12, 2017, 06:54:10 AM »
Nice build story. Thanks for sharing! Only the saddle is a bit bulky compared to the rest. I would consider trying sth. lighter. Doesn't have to pure carbon. Maybe one of these: https://www.aliexpress.com/item/GUB-full-3k-T800-carbon-fiber-super-light-weight-127g-bicycle-carbon-hollow-saddle-leather-saddle/32768889424.html

exzos

Re: Mickes Dengfu M06 build
« Reply #7 on: March 12, 2017, 11:55:10 AM »
Do you like the dropper post?

MickeF

Re: Mickes Dengfu M06 build
« Reply #8 on: March 12, 2017, 03:03:43 PM »
Do you like the dropper post?

Yes, it's fine. But I've only had it for two months, used it on my HT as well (trasfered it to the new build).
So it's to early to say how it will do in the long run.
Bought it from http://www.chainreactioncycles.com.
« Last Edit: March 12, 2017, 05:34:42 PM by MickeF »

xcfreak

Re: Mickes Dengfu M06 build
« Reply #9 on: March 12, 2017, 05:26:35 PM »
Great write up.

Looking forward to seeing how it handles the trails

Klaster_1

Re: Mickes Dengfu M06 build
« Reply #10 on: March 13, 2017, 12:07:50 AM »
MickeF, the bike looks awesome. Can't wait enough for my parts to arrive. So in the end, you went with both 22.0 bushings? Did you measure actual eyelets, were they wider or narrower?

MickeF

Re: Mickes Dengfu M06 build
« Reply #11 on: March 13, 2017, 02:43:04 AM »
I actually didn't measure the width before I ordered bushings...
I looked at the picture of in your thread and thought that 22.0 should be good and if to long I could adjust them some. But: Of course it is better to measure before ordering bushings. But I wanted to start the build as soon as I got the frame :)
In retrospect: 22.2 would be my choice!

MickeF, the bike looks awesome. Can't wait enough for my parts to arrive. So in the end, you went with both 22.0 bushings? Did you measure actual eyelets, were they wider or narrower?
« Last Edit: March 13, 2017, 10:46:38 AM by MickeF »

Polo7

Re: Mickes Dengfu M06 build
« Reply #12 on: March 13, 2017, 03:32:59 PM »
This is a great build, great-looking bike.

Where did you get the idea of using paint scheme Pantone 431c?

How much did Dengfu charge you for the paint job?


Regards.

MickeF

Re: Mickes Dengfu M06 build
« Reply #13 on: March 14, 2017, 03:19:50 AM »
This is a great build, great-looking bike.

Where did you get the idea of using paint scheme Pantone 431c?

How much did Dengfu charge you for the paint job?


Thank's!
I just like grey, bluish grey, and thought it could match the very very green fork.
(Dengfu let me choose from Pantone colors.
Cost for paint: $55. ($10 extra, since (I guess) it's not one of their standard colors.)
 
« Last Edit: March 14, 2017, 06:28:38 AM by MickeF »

Klaster_1

Re: Mickes Dengfu M06 build
« Reply #14 on: March 14, 2017, 07:37:02 AM »
So my thru axle has arrived, but without a lock nut. Mikael, did you use nut from other bike? Can you post a photo? I suppose it looks something like this.