Author Topic: My Winspace T1500 build  (Read 1993 times)

slow_poke11

My Winspace T1500 build
« on: February 15, 2023, 01:30:51 AM »
So, my T1500 arrived in the NY, my wheels arrived from Light Bicycle.  All in all, I'm really happy with the T1500 frame and the wheels from Light Bicycle.

I didn't go with the Winspace handlebars, mainly because they didn't have my size at the time, but partly cost.  The other components on the bike are:

- 105 disc groupset (mechanical shift)
- FSA stem
- Prime X-light handlebars (not aero, no internal routing) - mainly got these as they were cheap, light, recommended, and temporary (once, I'm happy with the sizing and fit on the bike, I'll at some point switch to a fully integrated handlebar and move the prime's to my old bike, if I like them).

Given no internally routed handlebars, cables are routed through the headset, everything goes into the down tube except for the front break (obviously).

OK, so I took on this project with virtually no bike mechanical experience.  Before this, the most I'd done was change my cassettes and chains. I generally don't even look under the hood of my car.

In terms of the build, I've completed the following, none of which I'd ever even tried to do before:

- cut carbon steerer tube down to size (seatpost was OK, just!).
- installed forks, stem, handlebars, shifters.
- installed seatpost and saddle.
- routed brake hoses, cut hoses down to size, installed new barbs and olives, bled brakes.

So all, in all, the only things I had left to do were:
- bottom bracket installation
- crank, chain and pedals installation + tune everything.

I'm really impressed with the T1500 apparent quality (haven't ridden it yet).  My only feedback is:
- I'm a bit concerned that there is no plastic guard separating the gear cables from the carbon on the frame as they run under the bottom bracket area, as the cable for the front derailleur comes out of the frame, and where the cable comes out of the rear chainstay above the thru axle hole. I'm worried about the cables cutting through the frame where there is contact.  As a result, I've left some of the plastic routing guides in those particular places.
- The seat clamp is really fiddly. It's a struggle to attach the saddle if you don't have 3 hands. You have to use their seat clamp because the seatpost is proprietary.

Today was press-fit bottom-bracket installation day.  Everything seemed to go really smoothly. The whole thing seemed to be straight and I thought it was done.  However, when I tried to put the cranks in, they wouldn't go out the other end.  I looked inside and found that the centre tube had not attached to the other side and while the bearings might have been OK, the centre tube had pressed in crooked (see photo).


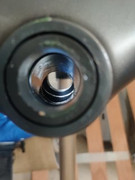
So, I'm guessing this is not easily resolvable?  I'll need to somehow break the centre tube (which felt like plastic before I installed it) so that I can get a bottom bracket removal tool into position, then remove the BB and install a brand new BB (even assuming the BB is reusable, there's probably no way to just buy the centre tube?

Any suggestions appreciated.

Thanks
« Last Edit: February 15, 2023, 01:36:00 AM by slow_poke11 »


jonathanf2

Re: My Winspace T1500 build
« Reply #1 on: February 15, 2023, 09:41:33 AM »
Have you considered a threaded PF style bottom bracket? Once you're able to get that jammed BB out, I might consider switching over to that just to make future maintenance easier for yourself while you're still in the build process.

slow_poke11

Re: My Winspace T1500 build
« Reply #2 on: February 15, 2023, 02:50:54 PM »
Have you considered a threaded PF style bottom bracket? Once you're able to get that jammed BB out, I might consider switching over to that just to make future maintenance easier for yourself while you're still in the build process.

That is a great suggestion! I'll definitely do that.  I'll have to to reinstall all the cables once I change to fully integrated handlebars, so easier access to the BB area would come in handy.

slow_poke11

Re: My Winspace T1500 build
« Reply #3 on: February 16, 2023, 01:44:40 AM »
Good news. LBS managed to push the BB centre tube into place without removing the BB. Crankset is in, chain sized and installed. Nearly there!  However, next time I'll definitely replace it with a threaded PF BB

s3si1u

Re: My Winspace T1500 build
« Reply #4 on: February 16, 2023, 02:22:21 AM »
Every time I've installed a Shimano press fit BB the center tube ended up looking something similar to that. Just kinda had to carefully work the plastic cup with the spindle until everything went into place.

slow_poke11

Re: My Winspace T1500 build
« Reply #5 on: February 18, 2023, 09:59:12 PM »
My build is finally complete!


Took me from mid Jan to now. It was a steep learning curve, but it was very enjoyable (most of the time). I also had some help from a friend at a local bike shop at times when I got stuck (bb issue mentioned in this thread, final gear tuning, front brake rub (turned out rotor was a bit bent, getting super-tight tyres onto the rim)

Final weight was 7.9kg without pedals and bottle cages for an XL.  To be honest, the weight is not a big thing for me.  Plenty of opportunity to cut weight on the rider! It's got 105 7020 groupset, chain catcher, not the lightest stem, an old saddle, more stack than it needs, longer seatpost than needed, so weight was to be expected.

I've done a quick test ride, but not a proper ride.  First impressions are very good.  Fit is not right and needs adjustment, stack, and handlebar positioning. The shifting needs a bit of work. Possibly too much friction from the guide lines I left in the frame due to my concern about contact points of gear cables on the frame (maybe I'm being too precious about that). Also I'm comparing it to my SL3 which has 105 7000 with fully external cables.
« Last Edit: February 19, 2023, 12:47:43 AM by slow_poke11 »

oleg

Re: My Winspace T1500 build
« Reply #6 on: March 02, 2023, 04:56:28 PM »
This is my WinspaceT1500 build.
Weight without pedals 7.8kg with framesize L. With my MTB double-sided pedals with cage comes at 8.15kg (personal preference).
Build details:
1. Ultregra Di2 8170
2. Hunt 44 Aerodynamicist wheels
3. Custom 3D printed cable routing system. Unfortunately FSA N69 has not worked for me, it had larger bearing than needed and was 2-3mm wider from each side, looked pretty ugly as a mushroom, so I went with custom 3D printed solution.
I also did not want the original bar and stem combo because it does not provide any position fit possibilites, rather then removing spacers.
4. Lightweight UNO -17 degree 110 mm stem and aluminum Pro-Vibe handlebars.

Saddle is a test one, so definetely will be some changes here.
« Last Edit: March 03, 2023, 03:47:21 AM by oleg »

oleg

Re: My Winspace T1500 build
« Reply #7 on: March 03, 2023, 04:06:52 PM »
Had a training session today: 52km and 1000m altitude change, 3 middle-sized climbs in total.
What to say: it is really a stunning bike, it has exceeded my expectation in every moment.
I could replicate my position from the previous bike.
1. Cornering and descends in general were a breeze. Never felt so confident on any bike, and it was only the 1st training with it.
2. Climbing: also very good, it is lighter about 1 kg from my previous bike.
3. Power transfer - this is where the bike shines. I could directly feel the power transfer, bike is on the stiffer side, not as stiff as aluminium though.
May be for some people it would be a disadvantage, but I am totally fine with that.
4. Shifting: perfect, never missed a gear, Ultegra DI2 was 100% worth it.

Re: My Winspace T1500 build
« Reply #8 on: March 06, 2023, 09:22:05 AM »
Had a training session today: 52km and 1000m altitude change, 3 middle-sized climbs in total.
What to say: it is really a stunning bike, it has exceeded my expectation in every moment.
I could replicate my position from the previous bike.
1. Cornering and descends in general were a breeze. Never felt so confident on any bike, and it was only the 1st training with it.
2. Climbing: also very good, it is lighter about 1 kg from my previous bike.
3. Power transfer - this is where the bike shines. I could directly feel the power transfer, bike is on the stiffer side, not as stiff as aluminium though.
May be for some people it would be a disadvantage, but I am totally fine with that.
4. Shifting: perfect, never missed a gear, Ultegra DI2 was 100% worth it.

Not as stiff as aluminium ? What was your previous aluminium frame ?

oleg

Re: My Winspace T1500 build
« Reply #9 on: March 09, 2023, 06:26:05 AM »
My Alu frame is Radon R1, seatpost, wheels are all from aluminum and tires are 25 mm.
At winspace I have 28mm tires and carbon wheels.
So, it may be quite subjective to separate frame feeling from the whole system, but yes, I do feel aluminum has more direct and harsh feeling.

Yunglord

Re: My Winspace T1500 build
« Reply #10 on: March 09, 2023, 09:24:47 AM »
Harshness does not mean that it is stiffer there's just less dampening from the material which in the end transfers more energy to you and what you perceive.

patliean1

Re: My Winspace T1500 build
« Reply #11 on: March 09, 2023, 10:44:21 AM »
Owner of both a T1500 and current Allez Sprint here...

Unless you plan on running identical setups and components (tires, psi, wheels, saddle, bike position, carbon bars etc) it will be quite difficult to detect any significant differences in harshness and stiffness. In theory the Allez should be harsher since it's alloy, but this doesn't mean the frameset is inherently stiffer just because.

Having said that, I do enjoy both frames but for different reasons. Quite frankly both are awesome and you can't go wrong with either, despite the Allez being aluminium. My Allez Sprint setup is lovely for flat fondo rides. The T1500 is awesome for punchy fast group rides/races. Both are super easy to put power down.

Anecdotally speaking I've found the more aggressive my bike position is especially at higher speeds, regardless of any specific frame, the more the harshness is mitigated.