

Chinese Carbon MTB Forums
News:
Happy Holidays!

 See likes
See likes given/taken
| Post info | No. of Likes |
|---|---|
|
Re: Haidelibikes Super light weight carbon all inner cable road bike frame FM-CR025
FM-CR025 is made by material T800+T1000 carbon fiber to strengten the frame. And super light mold and with EPS technology and one piece mold. Thanks for interesting. Feel free to contact us if any question. eddy@haidelibicycle.com July 07, 2023, 04:54:56 AM |
1 |
|
Re: LTWOO ER9 & ERX - Electronic groepsets
One of the first builds I've seen with it July 10, 2023, 03:45:51 PM |
1 |
Velobuild GF-002 Bikepacking build.
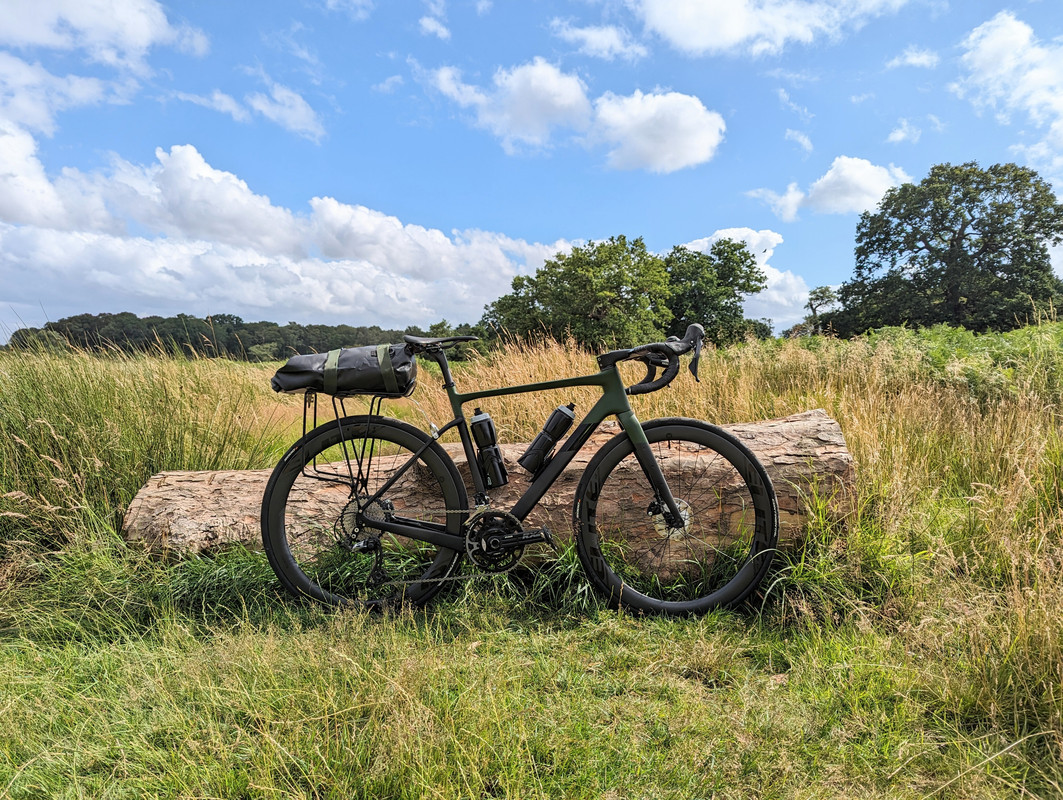 Just finished my Velobuild GF-002 build and wanted to share. The build was good fun but being my first time building a bike it was a struggle at points. The hardest part was internal routing 4x hoses including 2x Jagwire compressionless shift housings. I am also struggling to the get the front derailleur to shift up properly so need to do some more tinkering there. Issues: The rear brake flat mount on the GF-002 was completely off so I took it to a LBS to face the mount which worked, sadly they soaked the brake pads in mineral oil in the process.  I originally asked Velobuild for British Racing Green in Gloss and gave them a pantone which they confirmed was ok before ordering. After paying they effectively said 'sorry we dont have' and said I can have the frame in a 'similar' colour which in person is akin to Satin Army Green. Not what I was going for. Wasnt impressed with the paint quality either, there are noticeable edges where the colours change. Not gonna complain for a $60 paint job. I will eventually repaint myself. EliteWheels originally sent out the wrong wheels so I disputed and asked for a partial refund, then sold the wrong wheels on eBay and re-ordered the right ones. Was not too impressed with their service on Aliexpress including asking me to 'close the case to get a refund' and refusing to re-send the correct wheels unless I paid extra. Re-ordered from them on another Ali account and had no issues. The wheels are the highlight of the build for me. 1320g @ 50mm depth 21mm internal and ratchet hubs for $620 is nice. The TPU inner tubes have plastic stems which dont seem to seal properly, the tyres lose a decent amount of air every week. Might try some PTFE tape on the valve core threads. I didnt research much in the saddle and will probably try a 3d printed one that TraceVelo recommended at some point, the Mixed one is pretty comfortable but I can see it getting a bit painful for 100+km days. Impressions: I have only ridden for about 100km or so but loving it so far, never had a drop bar bike so I didnt know what to expect. Aside from the FD not shifting up cleanly no issues so far. With the out of Shimano spec 11-40 cassette I need to be careful not to cross chain otherwise its not pretty. I'm already thinking the 34-40 gearing is a bit excessive and might switch to a 11-36 cassette or 1x but will wait for a while to tackle some more climbs. I will go on some longer trips next month and hopefully multi-day bikepacking in September.  Components: Velobuild GF002 Frame EliteWheels Edge Disc GRX600 2x11 Shifters GRX810 Rear Derailleur With Sunrace SP570 Extended link Shimano 105 Front Derailleur 11-40 SLX Cassette ZRace 50-34 Chainset Magene P505 Spider GP5000 32mm tyres Mixed 7D Saddle Newboiler TPU inner tubes IGPSport BSC200 head unit Total cost was around £2200GBP Weighs 8.3KG with pedals, no bottle cages. Let me know if you have any suggestions for the FD shifting, I'm thinking it maybe a qfactor issue and will try to swap some spacers around to see if it helps as the low screw is bottomed out and I feel like the shift cage needs to be further out. July 16, 2023, 01:50:25 PM |
1 |
|
Re: Lightcarbon: New LCR017-D (or Yishun R1058-D)
Hiya, I have ordered the Yishun R1058_D. It is different to the new lightcarbon, they have different geometry. Lightcarbon is the direct to consumer arm of yishun who are the OEM manufacturer, however you can sometimes order directly from Yishun. Apparently you can't always. I started a separate thread for the Yishun 1058D if you were interested, just search it. The model is there own design and mould, they have their own R&D department and are registered as a company in germany. You can get the frames with a 5 year warranty for 20% additional cost which I went for, all in it cost about 800gbp. The frame is a mix of T700 and T800 carbon, T800 on all high stress areas. Yishun are the OEM manufacturer for Ribble in the UK and Da Rosa in italy as well as some other small italian brand, the quality is supposed to be top notch. I am expecting delivery end of august/early september.
July 18, 2023, 05:17:06 AM |
1 |
|
Free Velobuild 177 Seatpost Binder
I was cleaning out the parts bin and found a spare 177 seatpost binder, ill ship it at cost to whoever could use it!
July 26, 2023, 02:55:35 PM |
1 |
|
Re: Carbon-repair process of my TFSA (SL6 clone) frame
Dry cloth, but I read a tip somewhere that you could stick some parchment paper with spray on adhesive to the carbon sheet to keep it from fraying when cutting. This worked very well. I applied the epoxy to the carbon sheet before I stuck it to the frame. I first applied some epoxy to the frame to cover the entire area, than wrapped the soaked patch around the tube and covered it with some more epoxy. After that I wrapped with the shrink tape and heated the tape. July 30, 2023, 11:48:17 AM |
1 |
|
Re: Carbon-repair process of my TFSA (SL6 clone) frame
Awesome for saving the frame. For future repairs, here's a few unsolicited tips. 1) You mentioned this already but do multiple layers. In this instance, you'd want to start with maybe a strip that is 1 inch wide and do one wrap with a bit of overlap. Second strip should be roughly 2 inches wide and the overlap of this layer should not sit on top of the overlap of the first layer. Keep the strips growing in width until you have plenty of coverage over the entire repair. This makes the cracked area have the most layers for strength and each additional layer helps transfer the loads to the good material. 2) If using a weave, change the direction of the weave between layers. Carbon weave is strongest in certain directions so alternating the layup can help even out the stresses put on the repair. 3) Always make sure the carbon weave is fully saturated with epoxy before laying it on the frame unless you are going to vacuum bag the repair. If not, you could end up with some dry spots in the carbon repair. A good portion of the strength comes from the epoxy so it's critical that you have proper saturation. 4) Before cutting your sheets to the size you need, leave them a bit big and lay them flat inside a plastic bag, I like to use plastic zip-loc bags but if you have to do larger pieces, any plastic can work. Pour a bit of epoxy on the carbon and close up the bag with little to no air in it. Use a squeegee to force the epoxy into the carbon fabric. This will make it "pre-preg" carbon fabric. Before removing the carbon, layout the size of the piece you need with a marker on the bag and cut it out with scissors. When you're ready to do the layup, you can carefully remove the two pieces of plastic off of your cut piece. 5) If you ever read an article from an expert that says to start with large patches and go smaller with each layer, you should REALLY question there credentials. Either way, great job and this should work perfectly for an indoor bike. July 31, 2023, 08:00:12 AM |
1 |
|
Re: Carbon-repair process of my TFSA (SL6 clone) frame
Thanks for the tip. I put the bike back together again this afternoon, and now I kind of regret ordering a new frame... 
July 31, 2023, 08:47:10 AM |
1 |
|
Re: LTWOO ER9 & ERX - Electronic groepsets
Quick update for those who are curious about eR9. I ordered no box and no battery. The package itself is well done. I have bad news and good news. Let me start with the bad news to get it over with. After lots of debugging, I found out that one of the cables (short one for FD) is faulty. Initially, the front derailleur (FD) intermittently stops working and I thought it was the FD that was faulty. It turned out, connecting that cable to the rear derailleur gives the same problem, and so I concluded that it was the cable. I have contacted LTWOO store from which I bought the set and now waiting for a response. The good news is all other components are really well-built. I was really impressed. The small hood size feels amazing on the hand. Buttons are very clicky and feel solid. The shape and reach of the levers are just perfect for the size of my hand and fingers. The texture of the rubber hood feels slightly different from Shimano, feels a little less smooth, but I like it. Since rear derailleur is fine, it shifts quickly and there is barely any noticeable delay from the moment the button is pressed to the shift. I can confirm that the trim option is there, but no auto-trimming (they removed this for patent reason). I can also confirm that LTWOO has now enabled 10 speed option on the application. The eR9 set came out to be just slightly lighter than the quoted weight by LTWOO. See the breakdown below. I have not installed the set on the bike yet. I was bummed that a single cable prevents me testing them on the road. This will have to wait a little while. August 20, 2023, 11:50:41 AM |
1 |
Re: Velobuild VB-R-177
Thanks! Just to be clear: Did the Velobuild stem include a topcap with a hole that allows the steerer not to be cut to size? Like the SL7 stem, where a different topcap with a 1 1/8 inch hole allows to run spacers above the stem. It does not (at least mine didn't), but I ended up designing and printing a cap: https://www.dropbox.com/scl/fi/6bgkpoy94cq7as3radns1/non-aero-top-cap-v3.STL?rlkey=gmaimol7bm771slfgn2v7wayp&dl=0 August 20, 2023, 05:48:28 PM |
1 |