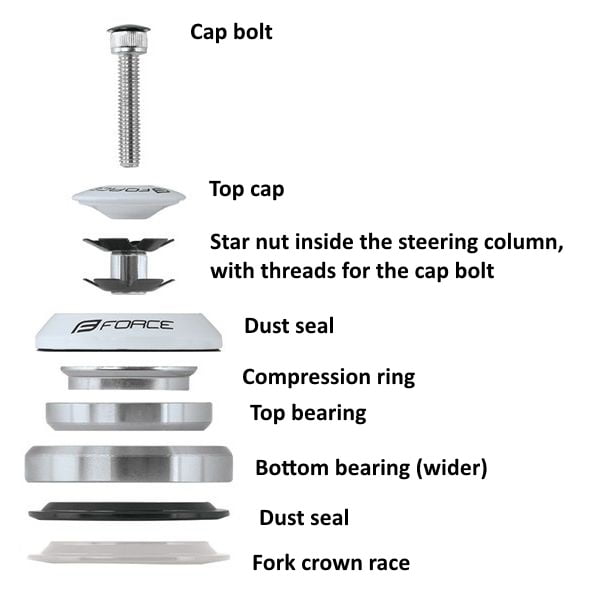
This diagram shows the order of headset pieces pretty well, though ignore the star nut - that's replaced with a compression plug for carbon steerer tubes. Also the 2 bearings are the same size in internally routed headsets, and there's no dust seal on the lower bearing.

The black ring in your first picture goes slides over the fork and sits below the lower bearing, providing an appropriately angled surface for the inner part of the bearing to sit on. The black semicircular piece is the headset compression compression ring which sits between the upper bearing and the top cap, with the open part facing forwards so the cables go through the gap up to/through the stem and/or handlebars. Personally I
really don't like that style of compression ring due to the risk of steerer damage (see
https://youtu.be/sKD2JSW9ul4?t=150). I ordered a Token S-Box headset for my G068, which comes with a far better and safer compression ring, and can confirm it works great.
Make sure you understand how a threadless headset works so you can preload the bearings properly - when fully assembled, there should be absolutely no play in the headset when you rock the bike back and forth with the front brake engaged. Don't hesitate to consult a bike shop if something doesn't seem right; the fork and headset are critical safety areas and need to be set up correctly. Also make sure you know how to cut a steerer tube, you shouldn't use just any old hacksaw blade and there's some finesse to it to make sure everything is good. Consult
https://escapecollective.com/wrench-like-a-pro-how-to-cut-carbon-components/ for what I think are some of the best tips in this area.
I kind of agree that the "dream build" videos are a decent starting place if you haven't built up a frame before, they're easy to watch and cover the basic steps fairly well. However, they're definitely not a be-all end-all instruction manual (especially with regards to torque, which is critical for carbon components), and I highly recommend consulting the Park Tool videos/articles - they're very well filmed/written and were super helpful to me when I was learning what to do (and what not to do). The "Rides of Japan" youtube channel also has some good videos that are more instructional than the "dream build" videos, if not completely comprehensive.